.jpg)
I wasn't intending on participating in this swap. Let's face it, my mother's quilt is still not done, and I really should be focusing more time and effort there. But then the little girl in me kept raising her head, screaming 'I want to play, I want to play!" :o))) So, guess what...
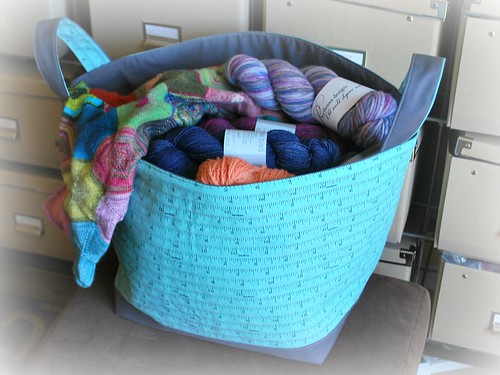
I get the sense that the majority of folks will be making more of a bag style tote. But I had other ideas... you see I'd picked up a great handmade storage bin/tote at a local craft fair one time and had been using it to carry my quilt swap boxes back and forth to the monthly meeting. This last month one of the girls joked that if I'd made the storage tote that I'd been using, that she hopes she's my swap partner. I hadn't made the original tote, but it got me thinking... Plus, looking around the group, everyone was hand carrying their quilting bee boxes, plus their show and tell projects, plus any snacks that they may have brought to the meeting... A gigantic carryall wouldn't go amiss!
There's a number of great free patterns online. I really liked this tutorial from Pink Penguin, and used that for the basis of my design (upsizing the dimensions so that it would fit the quilting bee box size that most folks are using): http://ayumills.blogspot.com/2008/05/tutorial-fabric-basket.html

The fabric is a simple tape measure design -- I figured that should have broad appeal with a quilting group :) -- and I quilted along the tape measure lines to help emphasize them. Although it's really not popping in these pictures. :))) The solid is Kona Charcoal. I used it for the base of the bag, and the lining. I also used some batting in between the layers to give the tote a little structure.
There were a number of, erm, shall we say 'learnings' along the way. The biggest one being how
On that note: I love the relative speed with which sewing can deliver a finished object... but don't love the inability to just unravel mistakes, as you can in knitting. Once that fabric is cut, it is cut. There was much forehead slapping in this house this weekend, with my original attempt at boxed corners!!!
But all's well that ends well. And I'm thinking of making a couple more of these for our home - between Naomi's toys, and my toys (read 'yarn') I could put some more to good use :)
I'll let you know how the meet goes. In the mean time, have a good week!
Hugs from snowy Colorado,
Sam xxx
6 comments:
What a fab tote bag. It looks really sturdy, and the fabric is great. Someone is going to be lucky.
Love it! I usually use woven baskets to keep things in, but love the idea of this. I am thinking it would be a great use of those upholstery ends I have around the house! But the sewing machine needs a serious overhaul before I head that way.
This is a terrific tote! The fabric is fun.
I love the tote, Sam! Very fun that you quilted along the ruler lines :) I'm glad you decided to participate.
Love that! The fabric is perfect and that's a great size!
Love it!!! I'm not a quilter so I'd use it just the way you showed ... as a knitting basket.
The recipient is one lucky duck!!!
Post a Comment