.jpg)
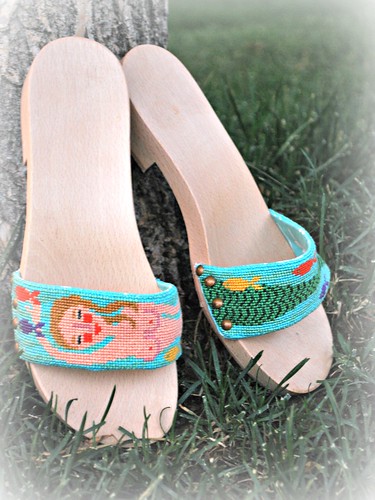
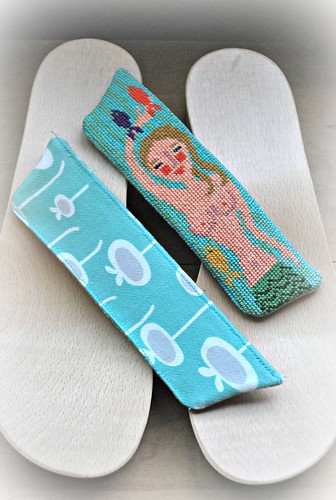
The kit is from Birds of a Feather. I picked it up at the The Yarn Studio in Minturn, Colorado. They have a floor devoted to knitting goodies, and another floor that is brimming with some of the most beautiful needlepoint designs, many of which were handpainted.
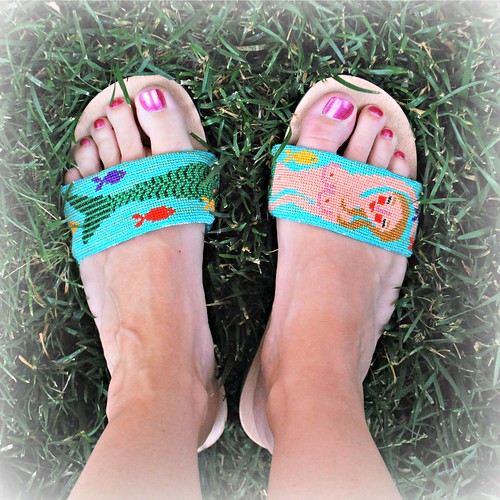
I'd finished the needlepoint some time ago. Such a sweet little design that stitched up quite quickly. My favourite part was adding the sparkles to the tail. It was the finishing that had me stumped - I'd never done anything like that before. I always send my needlepoint pillows to a professional finisher. And I couldn't seem to find any useful links on T'Internet.
This week I took the plunge (now that my sewing machine is back from the shop - yay!). It turned out to be a lot simpler than I was expecting:
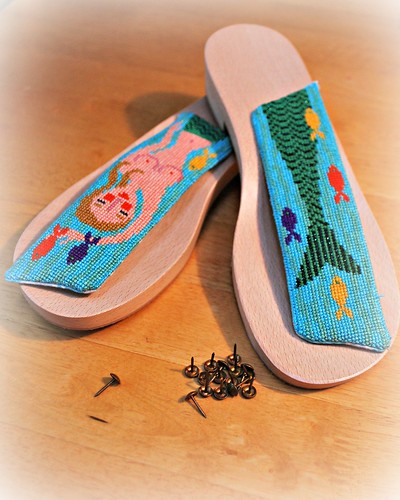
- Mark a 3/8 inch border around each sandal strap and then cut on that 3/8 inch line to remove the strap from the canvas
- Use the sandal straps as a template to cut out 2 pieces of fabric that would become the backing for each strap
- Place pretty side of fabric to pretty side of needle point and pin in place
- Stitch around 3 of the 4 sides of the strap: stitch as closely to the edge of the needlepoint design as possible
- Trim some of the excess fabric away from these 3 stiched sides and then turn the entire piece right side out
- Hand stitch the final side of the strap, tucking the raw edge of the needlepoint, and raw edge of fabric inside the strap as you work along
- Finally I added a top stitch along the top and bottom edge of the straps - about 1 row of stitches in from the edge. I'm not sure that this was absolutely necessary, but thought best to be safe and add this extra row of stitches to secure the fabric backing in place and hopefully prevent the likelihood of it coming apart and fraying.
Truth be told, the trickiest part was hammering the tacks to secure the sandal strap to the wooden sole. I'm sure it would have been easier with a vice grip, or other woodworking device for holding something in place while you hammer tacks into it. Instead I was sat at the dining room table with the wooden sandal firmly 'clamped' between my knees as I tried to finish this last step :o) The tacks aren't perfectly spaced and even, but I didn't kneecap myself in the process, so I consider it a success!
And that my friends is it! I'm off up to the mountains this weekend with some of my knitty friends for this year's Camp Wanna Knit Knit. The Yarn Studio is en route... who knows what goodies I may be sharing with you next week :)
Have a great week, and an even better weekend,
Sam xxx
3 comments:
Love love love these! They're fun, creative and they even pushed you to learn some techniques you didn't know. They'll make you smile every time you look down at your feet :)
These look really fun! Great job finishing the sandals. I remember when you bought them :)
How fun!
Post a Comment